Minggu, 23 Desember 2012

Mirrored Triangles: Tape Nail Art

Have been outta town last week and didnt have enough time to schedule posts ahead of time!
A girl has to take a break some time doesnt she? :D

Today's mani is a tape mani.

Base: ChG Tantalize Me


On the base once dry I put two triangle shaped cello and painted ChG Dorothy Who near the tips and on the base of nails I put ChG Full spectrum. I like how glittery these two are.


Turned out ok I think...considering its the first time I did a tape mani.

Rabu, 12 Desember 2012

Lush Lemony Flutter: Cuticle Butter Review

One of my pet peeves is frayed/dry cuticles. First let me confess that I dont do much housework or get my hands dirty often. I have a corporate job and the downside to that is being in air-contioned environment that tends to be dry.  Also the hazards of being a nail blogger are that I tend to change my polish more than normal..say maybe 2-3 times a week. Now I know thats not much given a lot of bloggers I know change on an almost daily basis. On the plus side I live in Mumbai..which doesnt freeze over. However yet I do find the need to moisturize my cuticles often or else they tend to dry and get frayed.

There are 2 basic things that have made a noticeable difference to my cuticles. One of them is the "make your own moisturizing nail polish remover." You can read that post here.
Other is a cuticle cream or balm or butter. Now once I set my mind on something I tend not to rest unless I get my hands on it. So I started to google about cuticles and cuticle care which lead me to believe that 2 products would serve my need. Burt Bee's Lemon Butter cuticle cream and Lush' Lemony flutter Cuticle butter. Needless to say I got both. So first up on the hot seat today is Lush's Lemony flutter.
This small 50 g tub in peculiar black lush tub packaging costs Rs.630/- ($12). It used to be Rs.550/- earlier..but Lush has increased prices recently.

It is small and a bit pricey if you see the size of this container.

But a little bit goes a really really long way. I need to just touch the tip of finger in the cream and it suffices for all 5 fingers with a bit to spare for a nail or 2 on the other hands.
Its thick, really thick, Think amul butter jus out from the fridge.
Rub it into your cuticles and nails and you get this strong aroma of lemony candy.
It is slightly greasy..but will easily get absorbed in the skin in say 5 mins.

I started using this around late august and wanted to throughly use it before I wrote a review on it. Its December now and I have barely managed make a dent in the top surface. And i use it atleast once a day. mostly at night so it can stay on my cuticles till morning.

With the climate turning slightly cooler I like to rub a bit of this on my palms and the back of my hands at night.


Now let me say you would certainly find a visible difference in a week. It lasts really really long. I have tried loads of other hands creams and body butters for my cuticles and none have worked so well. 

However I found that the smell does change a bit over a couple of months. It loses that zingy sharp lemony twang..and gets a bit milder and sweeter. But yeah still smells like lemon flavoured hard candy. The other thing is its not convenient to carry around so you might need to transfer a bit into a small tub say like an empty lip butter types..so you can carry it on the go.

Overall I really recommend this to you if you get bothered by frayed torn cuticles.


*products brought by me*

Senin, 10 Desember 2012

Darling Diva's: Channeling Coco


Today I have for you: Darling Diva's Channeling Coco!

Isnt it such a darling!!! Cotton candy encrusted with magical gems!
Layered over a light pastel pink polish as I found DD's Channeling Coco a bit sheer.
Thats 2 coats and some fishing of glitter. Applied smooth. Dried in 5 mins.
Now the glitter is meant to be sparse..thats the beauty of the polish..but I found I wasnt getting as much as I'd like..so I had to fish out a bit.
If you are looking for a polish that does not go over the top with glitter..but just a tiny bit of classy sprinkling of glitter...This one is for you! ♥ ♥ 

Contains: Big Pink glitter and small black hexes. I really love how the black glitter shows through.
Retail for $8 on etsy for a 15 ml full sized bottle. Can buy here.


Darling Diva's Polishes reached me flat 15 days. You can read my review of the other one here.
I couldnt stamp over this one. It just looked soo pretty on it own.
Arent you drooling? 


*Polish sent for review. But opinions are my own and honest

Rabu, 05 Desember 2012

Darling Diva's Release the Kraken V2: Swatches!


I cant tell you how excited I am to write this post!!!
A couple of weeks ago I saw this polish on a blog and I fell head over heels in laaauuu!! (love)!

I kept looking and searchin for this polish and landed up on this etsy page here: 
We got talking and the lovely creator of this polish Carrie sent me a pretty package!
Today I am reviewing one of my fav polishes ever!
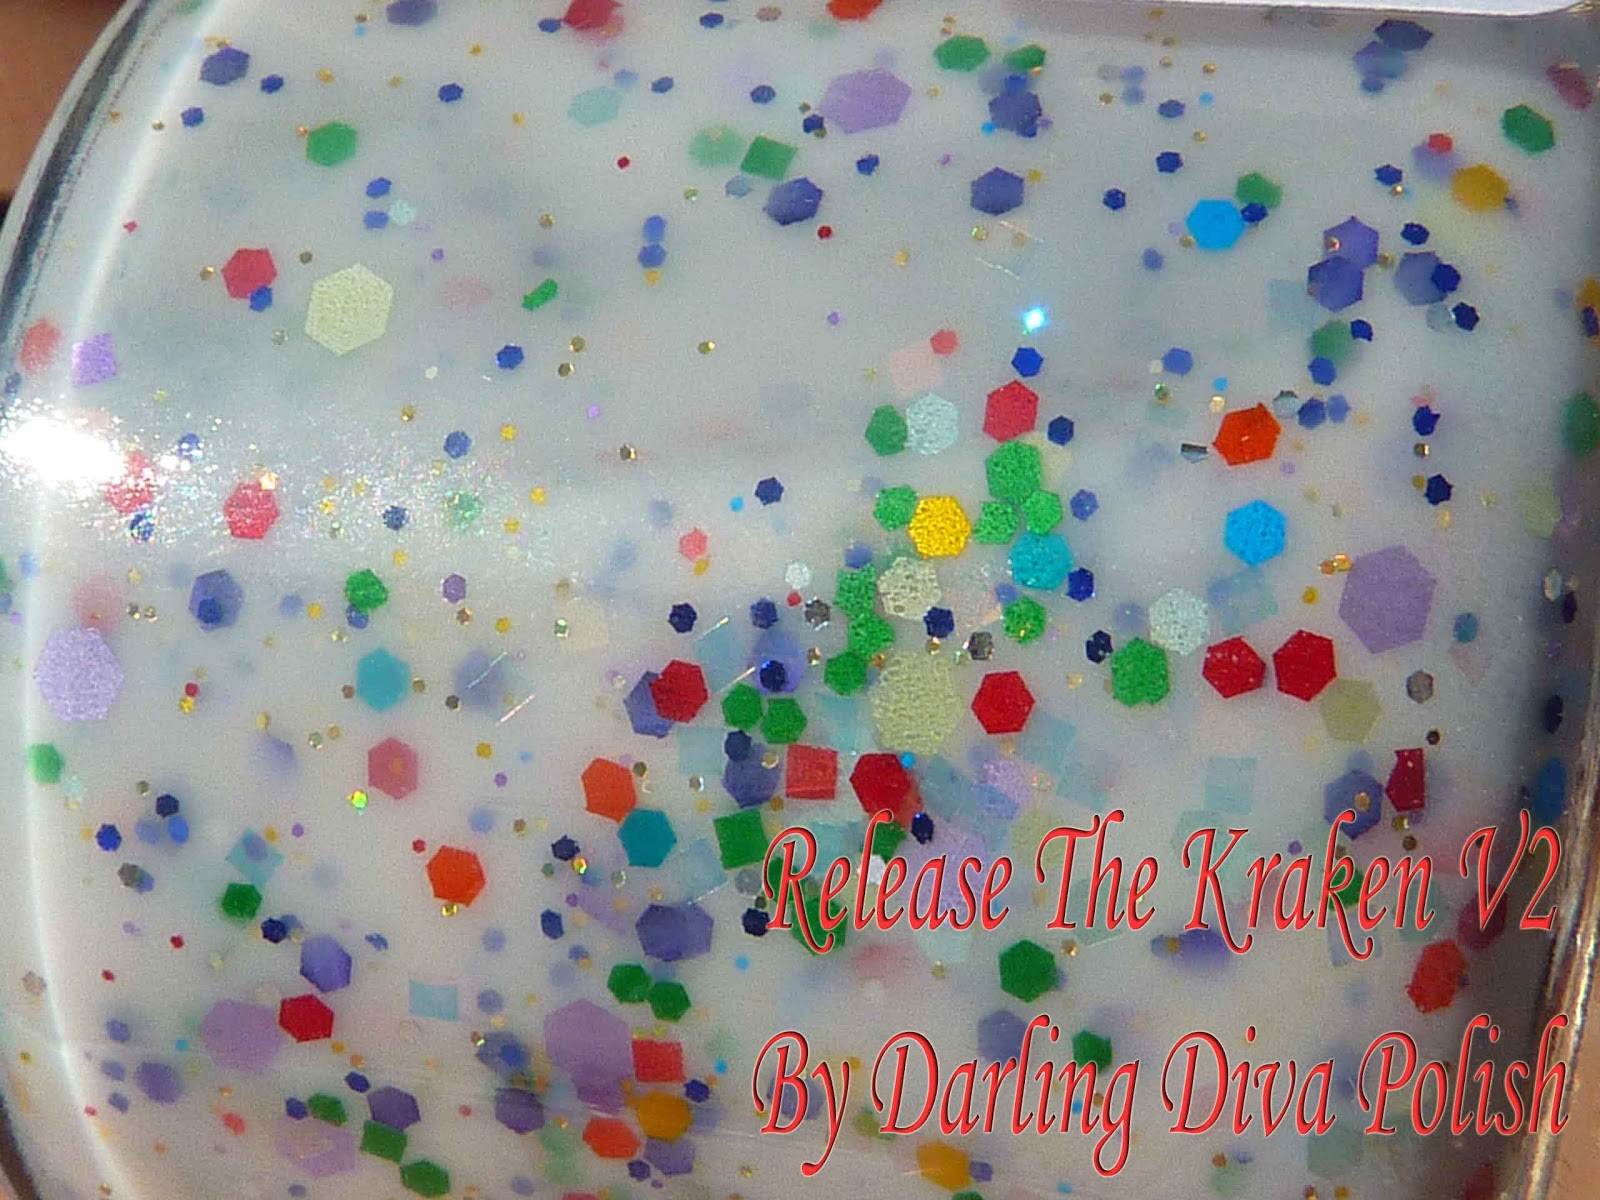
Presenting.... Release the Kraken V2!!


Now Kraken is the name of the legendary sea-monster-giant-octopus more famously seen in Pirates of the Caribbean movie series. And this Kraken looks adorable!!
$8 for 15ml (Most of Darling Diva's polishes retail for $8-12)
They reached me in India in 15 days flat!! I was very impressed!


White Jelly base filled with a bazillion colored glitters in various hex and square sizes
There are also some translucent hexes which shine very pretty!

Applied smoothly and took me 3 coats to make opaque. There is no white undercoat in these pics.
The polish is slightly thick but I believe it helps suspend the glitter better. There was zero fishing involved in painting my nails. The polish bottle is generously filled with glitter.
Cant describe how much excitement this polish has caused for me! :)
No chipping, no tearing for 3-4 days.


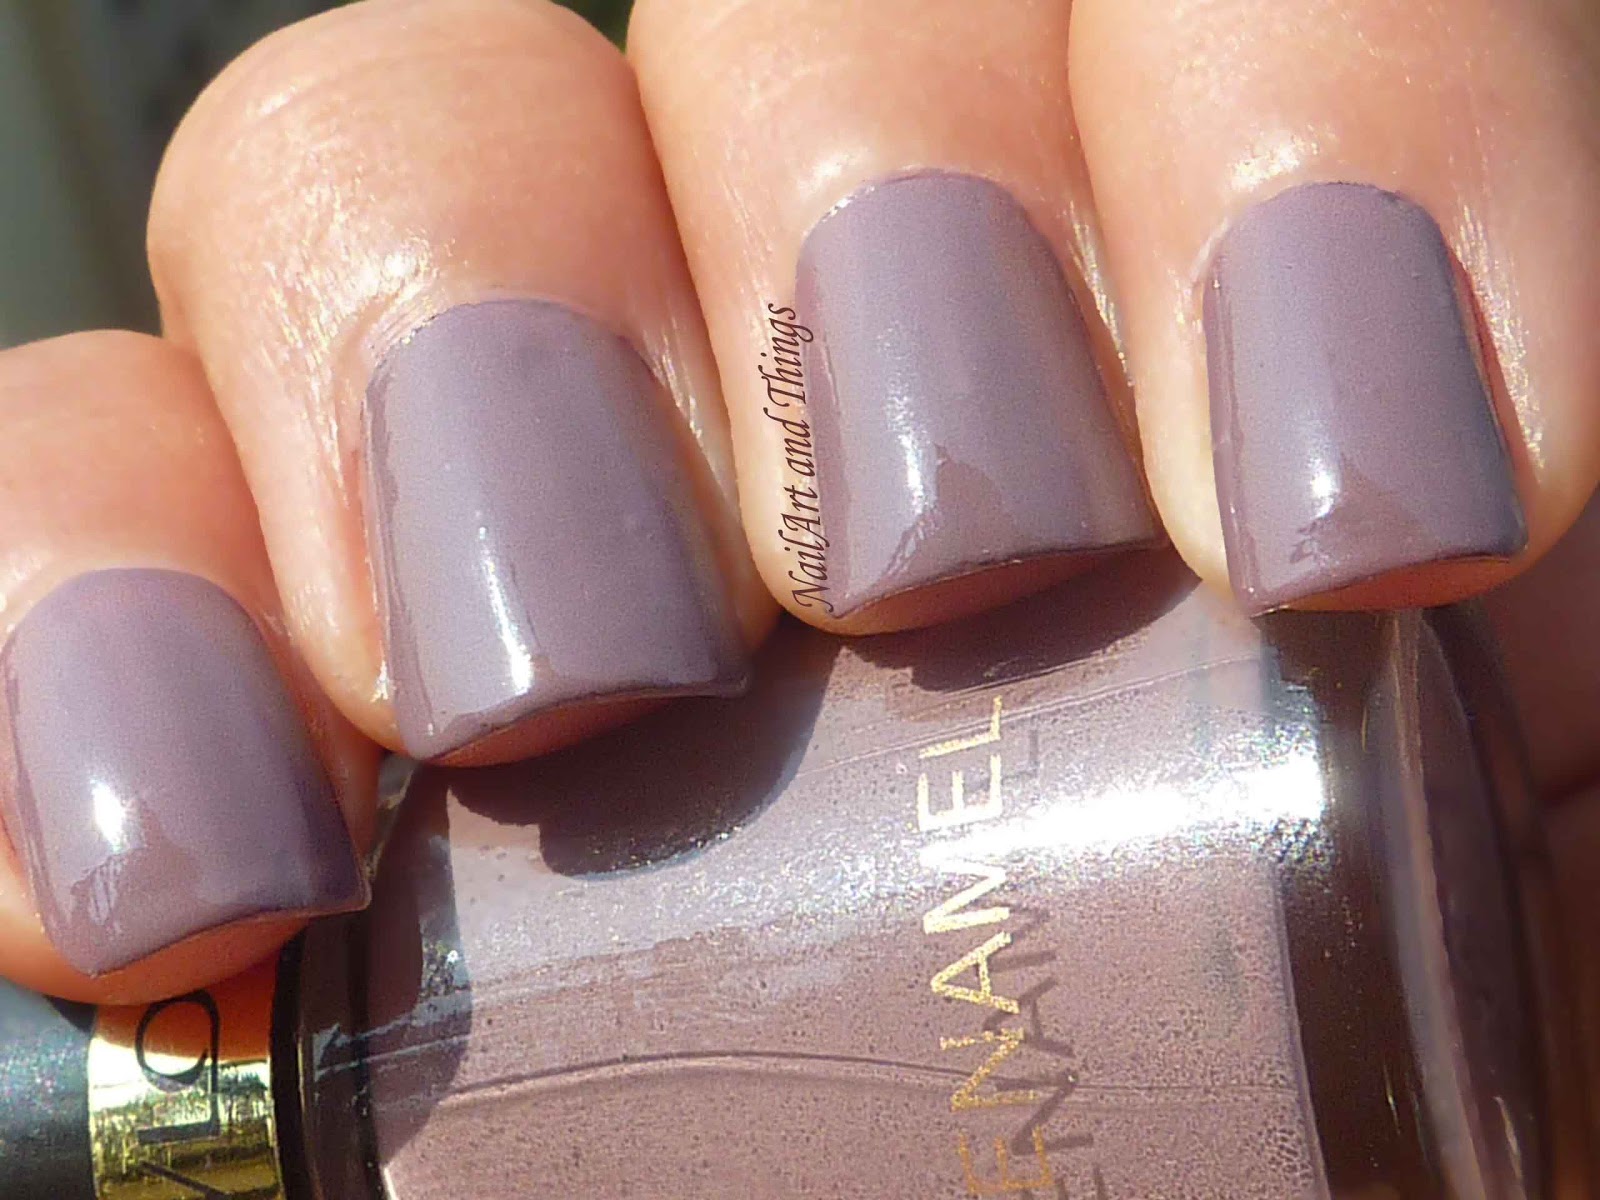
Stamped an accent in bold polka with Konad Red using RA 103

(jus an interesting tidbit: The red polish I was posing with above: slipped out and fell 12 storeys down!!! Fortunatley it didnt hurt anyone as if fell in some hedges and unfortunately I couldnt find it..so someone probably got lucky :D )

Dont you wanna try some Kraken for yourself???


*Polish sent for review. But opinions are my own and honest

Minggu, 02 Desember 2012

My First Franken Polish: Jelly Green Monster!!

Morning!
Now if you are wondering what Franken Polish is..It means creating your own polish by mixing existing polish, glitters and pigments. Like creating your own Frankenstein monster..Hence the name Franken Polish.

Now some ladies have got very enterprising with this concept and have started their own polish shops. These are known as indie polish makers. This concept is not so popular in India here..but is quite a rage in US and Europe. You must see some of their creations to figure why they are so much in demand and always sought after... yeah go google....Hey.. atleast finish reading my post!!

I was getting very saddened by the fact that these indie/frankens polishes were not available easy here so I decided to make my own. And Presenting....Kejal's Jelly Green Monster!!


Whats a Jelly you ask? Jelly polishes are polishes like creme..but much more shinier and glistening.
I emptied and cleaned out an old polish mini bottle. Half filled it with clear polish or a regular top coat.
Added a few drops of Lakme's Going Green and one drop of black polish.
Added a couple of brush fulls of Jordana's Cosmic Glitter polish.
Lastly I had one of these unbranded bottles of glitter polish..you know the cheap ones available at your local stationery/cosmetic stores around the corner. This one had large chunky and medium hex light gold glitter (See here). Add a couple of brush fulls of that.
And shake/dance.


This was much more glistening in real. So much that I had a little trouble picking pics where it didnt reflect the sky and clouds. If you look closely you can see small green and blue glitter of Jordana Cosmic.
Now if you wanna start making your own frankens you need non-bleeding glitter. i.e glitter that wont loose its colour in polish. and if possible a suspension base that will help the glitter stay afloat in the polish else it will sink like mine did and you'll find yourself dancing around with the polish bottle in your hand :D


I loved making this franken and have already got hold of a few bottles of polish just to empty them out to make my own frankens. Very addictive I say. Have you made your own??

Will next show you a beautiful indie polish to show you how much in love I am with these polishes!
Wait for it!

Rabu, 28 November 2012

Smokin Laces! : Lacey Nail Art

Whaddup Gals!

Me good as usual! I won a couple of nail art contest past few weeks.
One of them was from Inglot (India) and other one was Revlon (India). Yay!!
I won a Nail Art Pen from Inglot and I am yet to receive my Revlon gift. Will keep y'all updated.

In the meanwhile the weather here has turned slightly pleasant in the mornings and evenings. Not cold, no..but I am still eager to pull out my woolies and start wearing them. So maybe this is what I would call the "Fall Season" for Mumbai. Hehe!

Anywho coming back to the subject..I had got some of these gorgeous smokey shades from Revlon when they launched their new shades sometime back. You can see the other one here (Muse). This is the second one. I still have an untried from this buy, hopefully will put up soon.


Base: Revlon's Mischievous (455)
Its a creme smokey grey-purple. Nice creme finish, slightly streaky..but 2 coats made it fine and opaque. Took more than 5-8 mins to dry.

Stamping plate: Konad M71
Stamping Colour: Konad Pastel Pink

Love this dainty lacey stamp from Konad.
Goin off to enjoy the weather! Ciao!


*All products bought by me unless otherwise mentioned.

Minggu, 25 November 2012

Majestic Baroque Print Nail Art

One of my recent favorite combos this is!!


its an unbranded duo-chrome polish I found on one of my trips.
Shimmery metallic kinda finish. Layered over black.

Stamping Colour Gosh Metallic Purple. Stamps like a dream.
Stamping Plate BM 314
You know I really cant get enough of these baroque/victorian design stamping plates.
I wish someone made more of these with delicate/bold and all sorts of prints.


Doesnt the base colour look gorgeous in this pic with pink/red sparkle?

Kamis, 22 November 2012

Mattened Glitter Nails


Pinterest can get sooo addictive!
I had seen a mani on pinterest with matt glitter nails..but I couldnt figure out what polishes were used.
You can see the pin here and my pin board here


I attempted to do it with what I had. I knew I wanted duo-chromy glitter.
I painted the black base with Sally Hansen 
Made glitter gradient with Kleancolor Chunky Holo Fuschia.
KC Holo Fuschia glows from yellow-green to pink-red. I've tried to capture the glitter from both ends of the spectrum. See how it starts from yellow and is amber-red at the tips.

How to do a glitter gradient? I get this search term a lot..so here's how:
For a glitter gradient: I added a single coat of KC all over the nail. Allow a few mins to dry.
Next dabbed some KC at halfway down the nail. Again allow a few mins to dry.
Now just dab again using the glitter polish at the tips.

I added the Inglot Matt top coat after a day as I liked the glistening nails. However I like the matt version better.


It looked so much pretty in real! like twinkling lights. 
You have to matt-en some glitter to see what I mean. It looks absolutely gorgeous!! 

Have you tried to matt-en glitter?


Minggu, 18 November 2012

Black White and Glitter Nails

Whats not to like?
Classic Black and White? Check!
Glitter? Check!
Nail Art? Check!


I neeeeeed more Glitter polishes!! More More More!!

Base: Colorbar Exclusive 37 (white)
Glitter on accent: WnW Party of Five
Stamping Plate: Konad M85 from my Violetbag Haul.
I like this design from Konad..abstract and it allows to show the base too..plus non flowery.
I just think we dont need any more flowery nail plate designs..there are waaaay too much of those.

This is accent looked sooo pretty in real! It looks like the top coat smeared a bit in this macro..but I couldnt really see that in real.


Have a good start to this week!!!

Kamis, 15 November 2012

Striping Tape Nail Art

Hello! Good Morning!
I've had fun these past couple of days enjoying the festivities and binging on the food!!


After going the blingy way I decided it was time to play with something spunky!


Zig-Zag Striping tape comes to my rescue.
Base is Loreal's Midnight Mistress from the new range.
See another mani using this shade here.


I wanted to go for a simple clean look and this did it for me.

Do you like doing manis with striping tapes? Its fun and super easy!!