Kamis, 31 Januari 2013

Zoya Aurora Swatch


Hello everyone! I opened my computer about a month ago, and saw something On PlasmaSpeedos page, 3 Zoya polishes for free! Immediately I broke out my plastic to purchase my polishes. I got Aurora, Blaze, and Storm. I did have to wait a bit longer than usual due to a high demand for these, as they were the most recent collection (the Zoya Ornate 2012 collection). I decided to take a break from designing nail art, to just swatch some gorgeous nail polishes!

Zoya nail polish aurora swatch
Aurora: This is one of my top five favorite polishes that I own, and I am not sure which of those five. I love the way this polish looks, the holo and colors just mesh in perfect harmony. This purple color had so much dimension and looks so decadent on nails, and truly is ornate like the collection name says.

This polish applies beautifully, and I got full coverage in two coats, which is great, because most polishes of this type take one more coat to reach full 100% opacity.
Zoya aurora swatch nails
I did not want to take this polish of when I put it on. I kept staring at it through the day, lemming over the holo goodness.
This polish, I would say, has the most vibrant holo compared to the other two, Storm and Blaze.
I love the way these swatches look, And I think the color looks even more gorgeous irl (in real life).
I took a blurry shot so you can see how vibrant the holo/glitter is. All in all I would recommend this polish to anyone who has not tried a Zoya polish, and will probably be buying some back ups of this color when I run out!


- I have an obsession with Bath & Body Works products.
     Hector c:

Rabu, 30 Januari 2013

Spun Sugar Nails

Nail art for you all! I did this as a request from my sister. She said to do something with martinis so I thought of ways I could do this and decided to try the spun sugar method. This was my first time doing this texture/style of nails but I will definitely try it again soon, and maybe I can do a tutorial on it too.

I started this mani off with an ombre base of For Audrey and Happy-Go-Lucky, both by China Glaze. I used a makeup sponge and dabbed on three coats of the two polishes, reapplying polish to the sponge every coat. 
A close up of the spun sugar goodness! I used French White Tip by NYC. I put two drops of the polish on a mirror, which is my makeshift polish pallette, I then blew on the polish while stirring it with a very fine dotting tool. Once the polish Was about 80% dry I created strings by pulling the dotting tool away with a bit of polish on it. I the draped those strands of mostly dry polish onto my nail. This methods is not too difficult but may take a bit to get used to, since you have to wait for the polish to dry and the draping can get tedious. 


The drink did not come out as good as I had planned. I think I should have done a little more for the martini, so it would be a little more neat and noticable. I used a small nail art brush to draw the drink on my nails, and of course, you don't have to worry, this beverage is virgin because I am under 21!

The pinky is a bit blurred out in this photo, but that was the first nail I started on. I started on the pinky to be safe, just in case I messed up, and I did! in the photo following you will see that the polish strands are much thicker and not spread across the whole nail. I got the hang of it as I went through each nail though.

This design is a bit more tedious due to the ombre and waiting for the polish to dry for the spun sugar, but it is worth the wait for such a beautiful effect! 

- Drink plenty of water every day!
     Hector c:


January Nail Polish Haul!

So, I did kind of go overboard with the polish, but of course there are still colors that I "need." I recently started visiting my local Sally's beauty Supply, and I found that there were a lot of good discounts on polish to at I assume was not selling well, or out of season. colors would generally be reduced by 60-80% which is a great discount. I do not spend full price on polish, there are always sales going on and most of the time discounts are reasonably good. With all this mumbo-jumbo being said here is what I got!

Only 11 bottles total! I got the polishes from 99 cents only, Sally's Beauty Supply, and Cut & Blow.
I paid a grand total of $34 for all of this, the breakdown on prices, color, and brand is below...

 This came in my package from Cut & Blow, it was some free samples of a Alpha Beta Daily Face Peel by Dr. Dennis Gross. I am not to fond of using a face mask daily, but I am sure these will be gentle if they are for daily use. I have yet to try them, but maybe I will do a review on them and see how they work.

At Sally's Beauty supply I looked for the bin of clearance items and I found this gorgeous color, Angel Eyes by Orly. I love this polish, it is super fine blue glitter accompanied with bigger, fine, pale, blue pink and yellow glitters. This polish would have retailed for $6.99 so I did get a pretty good deal for it. I love Orly and I know this will probably be one of my all-time favorites, and part of my holy grail nail products.

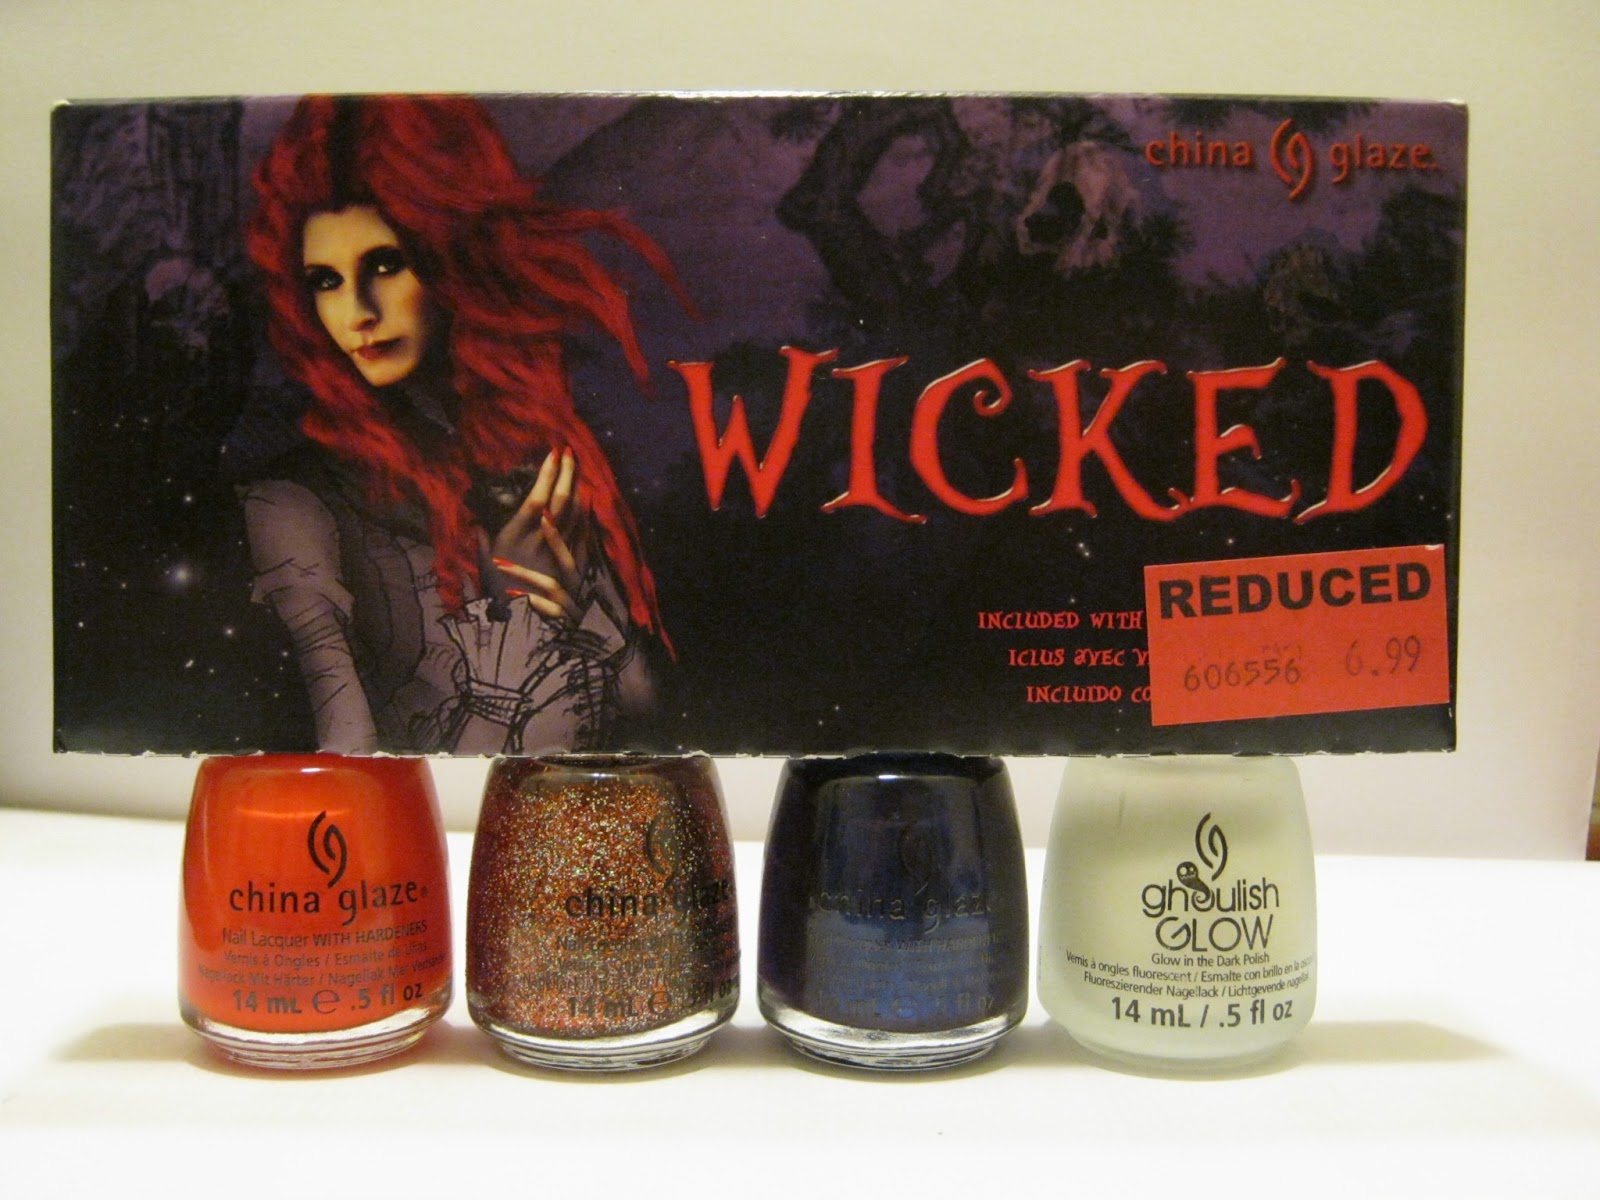
 Next, I went to the back of Sally's and found another clearance rack, and I saw the Wicked Halloween Quad by China Glaze that I was lemming over during october, but being my cheap self I decided not to buy it. I am so glad I bought this because it has gorgeous colors and I am lemming over Glitter Goblin, as most bloggers I have seen. I paid $6.99 for these four polishes, which is insanely good for China Glaze.

 Here are the bottles from the bottom, Rougish Red and Glitter Goblin.
 Here you can see the colors of Bizarre Blurple, since the other bottle shot later in this post was horrible. Ghoulish Glow is a clear, glow in the dark top coat that does add a bit of cloudiness when layered over a polish.
 Ghoulish Glow. This is so perfect because you can just layer it over anything to make it glow in the dark, though it can add some cloudiness to a polish when dry.
Bizarre Blurple: I told you! this bottle shot does not do this polish justice, it is a bit bizarre for my taste though I do like the color.
 Glitter Goblin: So gorgeous. I couldn't tell what glitter colors were in this polish at first, but I realized that it is fine orange glitters with the same fine size holographic glitters. The purple and green that come off of the holo Glitters is perfect with the orange glitters!
 Rougish Red: I finally have a creme orange! until now I had just shimmery oranges, but I longed for a creme and here it is! I would say this is a more reddish orange, but I would say it passes, swatches online look more red, but mine seems to look more orange even after I shook it. 
 Chunky Holo fuchsia: This is so gorgeous! I got this at my 99 cents store, and you guessed it. I got this, and the Gunky Holo Teal by Klean Color, for 99 cents! I have  yet to try this on but I am so eager to because holographic polishes are so gorgeous.
 Chunky Holo Teal: This photo does not show the holo, I would say it still, even in real life, is not as vibrant as the Chunky holo Fuchsia, but it is a pretty good holo.
Pros & Bronze: This polish came in a set with Love is A Racket and I got these two, and Rally Pretty Pink, and Spark De Tripomphe for $4.40 each and $5 shipping (total $21) on Cut & Blow, They have big names and great products for awesome discounts, and y'all know I don't like to spend full price on a bottle of polish. They currently have the OPI Germany collection for 5.50 a pop so go check them out! I dare you to not buy the whole collection!
This color is more orange and pink toned and overall more bronze irl (in real life). This is a shimmer that is a bit frosty when compared to a regular shimmer. I love the color changes that come with this polish, from copper, to purple, to pink to orange! 


 Spark De Triomphe: this is the most gorgeous silver glitter in the world! It has fine glitters and larger glitters! this polish is perfect for every outfit and as you know the shorter your nails are the better smaller grains of glitter look on your nails, and vice versa, respectively. 

Rally Pretty Pink: this is such a gorgeous shimmer, it is almost a duochrome and flashes between purple, gold and bronze. this one has a lot more gold and purple to it than Pros & Bronze, but I would consider them sisters.
Love is a Racket: This reddish pink is perfect for those of us who want that red with a twist of a pinker shade and a dose of shimmer, not screaming shimmer, but a bit more subtle shimmer that is wearable on everyone. And that's all folks! I have many more exciting nail posts coming up soon! Comment below if you have a nail request!


Eat your vegetables!
   Hector c:


Minggu, 27 Januari 2013

L'oreal Color Rich Le Nail Art Stickers: Review

Hellooo!! Good morning or afternoon!
Long time no see. I finally managed to open the locked polish cabinet and as luck would have had it, my internet service was conked off for a few days. Life is seriously difficult without internet!!

Today I have on review, L'oreal Paris' Color Riche Le Nail Art Stickers.
L'oreal has recently released these 3-D nail art stickers here in India. 
Here's a small snipet from their PR on these: 
"Need a manicure but don’t have time to wait for the polish to dry? Get ready to get FashioNAILable with L’Oreal Paris Le Nail Art stickers.

Inspired from luxury fabrics, these stickers are easy to use and can stay on for upto10 days.  We have three timeless collections that create ultimate nail wardrobe ranges:


Couture- Nail stickers that are inspired from the latest catwalk trends

L’Or- The timeless black and gold nail art stickers can add a vintage feel to your look

Diamantisse - Diamonds are a girl’s best friend! These stickers aren’t just stickers, they are nail diamonds!


What makes these nail stickers so unique?

The Nail Stickers are easy to apply. You just have to select a sticker that fits your nail, apply the sticker on your nail, fold the remaining over your nail tip and file off the remaining.

What makes these stickers different from the others?

1.       Zero Application Mistakes: Since the stickers are easy to apply, chances of any mistake is nil

2.       Zero Dry Time: Since these are stickers, you do not have to wait for it to dry! It saves you of all the misery of waiting for your nail colour to dry. Isn’t that a blessing?

3.       Doesn’t require a nail colour remover: When you feel like changing your sticker, all you have to do is, peel it off. It’s that simple!

4.       Zero Nail Damage: Worried if these stickers will damage your nails? Here’s the good news. The stickers are safe to use and will not damage your nails.

  The nail stickers not only glam up your look but also give your personality a whole new definition. Truly, nails are your style canvas! It’s time to get FashioNAILable, instantly!


Give your nails a luxurious makeover. Treat them with sophistication with Le Nail Art Stickers. Match your mood and your outfit with these fun nail stickers. All it takes is few minutes of your time."


I loved the black and gold ones the most. These stickers are textured, hence the 3-D claim. Designs are nice and very wearable. you can check other designs here: Loreal's facebook Page


 These Stickers cost: Rs 299/- for a single pack for 18 stickers. Adjusting for various sizes and fits of a person's nails, you'd get one wear out of these. They are sturdy material and wont tear when you remove or apply them.
However I find the pricing a bit steep for one manicure. But yeah considering if you are someone who goes to nail spa's for ur manis, this is a cheaper option.
I have a small pic demo if you are keen to try them: coz I found it a bit tricky to apply them cleanly.

1) remove the sticker from the package. Peel by holding the end of the sticker that will go on your tips. So incase you get a crease or fold, that end is extra long and will be cut off.

2) First place the tip of the sticker carefully over the base of your nails, aligning the sides in a straight line. See pic below. 

 3) now as shown press the sticker in sequence as shown, slightly tugging at the sides/ends to make sure there are no creases and folds in the centre and sides.


4) You can cut off the excess with a scissor or file it down as shown on the package. just be gentle when filing and do it in one direction from top to down. and you're DONE!! 
Ta-daaaa! 
I managed to place most stickers nicely except the pointer finger which got a bit creased at the tip and side.

Overall they r a bit pricey and tricky to apply. While id o like the textured feel, they didnt last me long. One shower and I had the ends starting to loosen up. I'd recommend these if you dont have the time to do a fancy mani and are really keen to spice up your nails for an evening.

Till I see you next! xx

Minggu, 06 Januari 2013

Happy New Year!! Shiny Disco ball Nail Art

I know I have been a bit off and what not..Just wanna assure you I am very much here and this blog still means a lot to me.
A couple of things have made my life a bit busy..and the tragedy is when I had the time after I came back from a small break in end of december one of my vanity cabinets' lock got stuck. this one contains most of my polishes :-/ so now I am mostly polish-less exception of few stray bottles.

Coming back! this mani is the last one I had before the cabinet got locked.


I received this pack of glitter from Born Pretty Store for review. After seeing the glequins manis put up by Nailasaurus I couldnt resist having a shiny disco ball mani :D


This pack of 12 Born pretty glitter pot is for $6.45 : you can see it here: link
The pot size is almost like those of the body shop lip balms and is packed with glitters. Make sure you close the windows and fan before you open this or you are bound to get it over you if u r even a teeny bit sloppy. 
The colours are gorgeous and I so wanted to use all in a day. Sequins are almost 2mm in length and in hex shape. helps cover your nails quickly.
This code will get you a 10% discount from BP store: KJ5X31 

Base: Catrice : Genie in a Bottle
Lovely dull gold to green duochrome given to me by my Blogger pal the lovely Caroline from GoodLackNail. She got a huge stash by the way of utterly gorgeous shades which I have a hard hard time finding..incl 2 HTF HOLOS!! :D Thanks again Caroline!!!


After the base I proceeded to turn the accent into a shiny disco ball. It was pretty easy.
Take a toothpick dip the tip into fevicol or similar PVA glue. Light touch a glequin with the tip and place on your nail. Took me 8 mins to do the whole nail. 

Hope u liked this. And Wish you all very happy new year! (yes....soo belated)
Stay tuned for an exciting giveaway as soon as I crack the lock on the cabinet.